

This is the third post in a series explaining how to set up a Debian Vagrant box on a Windows 10 machine. In the first post, I talk about how to download a Debian base box from the Hashicorp atlas repository of base boxes, and how to create a Virtual Machine from that base box. In the second post, I describe how to install the VirtualBox Guest Additions into your Debian box, and how to configure a shared folder between the VM and your Windows host machine. In this post, I describe how to install a GUI.
If you know what you’re doing, and you want to skip all the explanations and just see the steps involved, feel free to look at my summary!
Note: this blog post was written with Debian 9 Stretch, but I’ve tested it with 10 Buster, and everything works the same. The screenshots will vary slightly, but everything works good!
Setting up your Vagrantfile
We’re going to make some configuration changes to our Vagrantfile, so if your VM is currently running, shut it down:
vagrant halt
The first thing we’re going to want to do is to set up our Vagrantfile to configure VirtualBox with our Vagrant box. There are some minor changes we need if we’re going to run a GUI on our VM. Open up your Vagrantfile in your favourite text editor. Find the section of commented out lines that begin with “Provider-specific configuration”:
 Add the following lines after that section:
config.vm.provider "virtualbox" do |vb|
  vb.gui = true
  vb.memory = "2048"
  vb.customize ["modifyvm", :id, "--vram", "12"]
end
This part of my file now looks like:
 What this does is configures VirtualBox. If you are using a different provider, say VMware, you’ll need to do something different; that’s outside the scope of this post.
What these lines do is as follows:
- “vb.gui = true”: configures VirtualBox to appear when it is run. Up until now, when we start up our VM, we don’t actually see it. This line changes that.
- “vb.memory = “2048””: assigns 2GB to your virtual machine. This isn’t necessary for running a GUI, but the default of 512MB isn’t enough for the development work I do. If you don’t have a lot of memory on your Windows host machine, leave this line out.
- “vb.customize [“modifyvm”, :id, “–vram”, “12”]”: assigns 12MB of video RAM to the virtual video card. The default is 8MB, and that’s not quite enough to run full-screen on my 1920×1080 display. The minimum is 9MB, but I like to give myself a bit of wiggle room.
Installing the GUI
Now that we’ve got the Vagrantfile set up, start up the VM:
vagrant up
The VM will start as normal, but what will be different is that you’ll see the VirtualBox GUI running. We’ll just ignore it for now, and continue to ssh into our VM.
vagrant ssh
If it’s been a while since you set up your VM, you may want to make sure you’ve got all the latest packages, although this isn’t always necessary. I do it for completeness. Execute these commands inside your SSH session:
sudo apt-get update
sudo apt-get upgrade
Now, there’s a single command that we need to execute to install the GUI. I’m installing the XFCE desktop; it’s nice and simple and easy to use.
sudo tasksel install xfce-desktop
This command now goes out and downloads all the required packages, then installs them. Be warned that this is a slow process; when I did this as I was writing this post, it required downloading 944 packages! Also, know that if you want to wipe out your VM and recreate it with “vagrant destroy / vagrant up”, you’re going to have to download all these packages again. But, sometimes that can’t be helped…
Once the download and install completes, log out of your SSH session, reboot the VM, and it will start up with the GUI!
logout
vagrant halt
vagrant up
Using the GUI
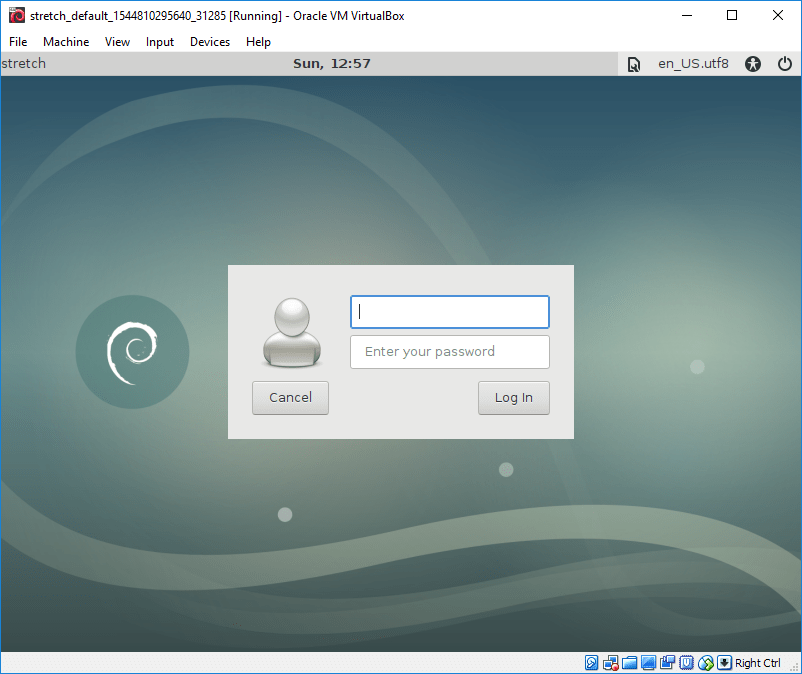
Once your VM boots, you’ll have a GUI window:
You can use this window as-is, but it’s kind of small. I always maximize it. The first time you do this it’s going to look kind of strange:

Not a concern, as it will fix itself when we log in. Now, log in on the GUI, using the username of vagrant and the password of vagrant. The GUI will log you in, and resize to use the full screen:

And, you’re done! You’ve now got a Debian box with a GUI running in Vagrant!
Shutting down the VM
When I’m done working with the GUI, I always first log out of the GUI (Applications / Log Out from the XFCE menu, then choose Log Out), then I switch to my Windows command prompt window and do a “vagrant halt”. I don’t know if this is necessary, but it’s probably good practice: it lets the Debian GUI cleanly shut down, and then lets Vagrant cleanly shut down. It’s probably not a problem to just shut down the VM from the GUI, but I’m a little anal-retentive that way….
Thank you for the post. This helped me a lot. My only problem is that except for the very first time I started xfce by the command startxfce4in the virtual machine, every time, even after a clean reboot of the computer, I always get the X server is already running error message. I am not sure what to do.
I’m not quite sure, but I wonder if you need to increase the size of the video memory on the VM. 12 MB works for me on Buster, but on Bullseye, I’ve had to increase that to 16 MB. Maybe give that a try and see if it helps.
Shane